In the previous article I explained that I wanted to use a Fujitsu Futro S450 thin client as a permanent MQTT broker for my local environment. I explained how I made several hardware upgrades so it could run an MQTT broker more or less comfortably and at low cost. That’s where I left it. In today’s article, I’ll explain the steps to change the operating system and install the first version of the MQTT broker, which I’ll leave running with its default configuration.
A new operating system for the Futro S450
I like Linux, I can’t help it. Always have. I don’t care which distribution. As I mentioned, I had already installed Lubuntu 14.04 on the Futro S450, so there should be no problem running the latest Long Term Support (LTS) version of Ubuntu Server. I don’t need a graphical interface (nor do I want one, with such limited resources).
Download the Ubuntu Server 16.04.1 ISO
The Futro S450 processor is 64-bit, so the first step for installation is downloading the 64-bit version of the Ubuntu Server 16.04.1 ISO. From https://www.ubuntu.com/download/server you can download the ISO image, although I recommend the Torrent, which is much faster (the torrent is also downloaded from that link).
Once we have the ISO downloaded, we either create a bootable CD (Ubuntu Server fits on one) or create a bootable version on any USB stick. The Futro S450 doesn’t have a CD drive, and although you can use an external USB CD drive, it’s much more convenient to write the ISO directly to a USB stick. I used an 8 GB one I had lying around. It will lose its data, so make sure it’s a USB stick used for casual purposes without anything important on it.
Create a bootable USB for Ubuntu Server 16.04.1
In Linux there are many ways to create a bootable USB from an ISO image. With classic Linux commands like dd or cat, or with graphical tools. It had been a while since I created a bootable USB from an ISO, but the last time I did it in Linux using the Unetbootin utility. This time I did the same, but for some reason Unetbootin didn’t properly write the ISO to the USB stick and the Futro S450 didn’t detect it as a bootable disk. I realized this after several attempts. So I opted to create the USB from the ISO using another method: the Ubuntu “Disks” tool, which is the distribution I currently use on my workstation.
Steps:
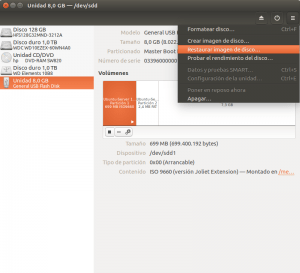
- Insert the USB stick where you want to write the ISO
- Open the Disks tool and select the volume corresponding to that USB stick from the left panel (important—don’t write the ISO to your hard drive instead of the USB stick, haha)
- At the top right of the window, expand the menu and select “Restore Disk Image”
- Select the Ubuntu Server ISO image you downloaded
And that’s it. It will ask you fourteen times to make sure you’re writing the ISO to the USB stick and not somewhere else, then it will ask for the root password. Finally, confirm to create the image on the USB disk. A progress bar will appear to indicate when it’s finished.
Boot and install Ubuntu Server 16.04.1
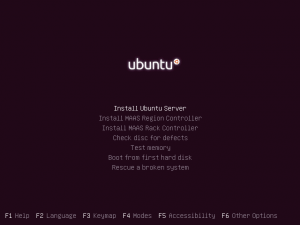
Once the bootable USB is correctly created, the installation has no differences just because the target machine is a thin client. You just need to make sure to select boot from USB. To do this, simply insert the bootable USB into the Futro S450 and press <F12> during startup to bring up the boot menu. Just select the USB and press <Enter>. The installation will begin as usual.
I won’t detail the Ubuntu Server installation because that’s not the purpose of this article; plus, the Internet is full of guides. I’ll just mention two peculiarities I configured. First, the partitioning. I ended up using the 16 GB USB stick I had at home, so the Futro S450 now has a 4 GB Compact Flash and a 16 GB USB. I configured the partitions as follows:
- Compact Flash → 1 ext4 partition of 4 GB → mounted on
/ - USB → 1 swap partition of 4 GB
- USB → 1 ext4 partition of 12 GB → mounted on
/var
This way, the branch that may grow the most (due to logs and broker storage) is on the USB with more space.
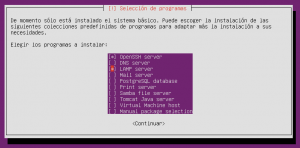
Second, I’ll need an SSH server to access remotely since I plan to place the Futro S450 high up, without keyboard, mouse, or monitor. So during the installation process, when asked whether to install a predefined set of packages, I deselected everything except “OpenSSH server,” which will leave sshd listening on port 22 after installation.
Configure the network statically
By default, Ubuntu Server 16.04.1 configures the network to obtain its settings via DHCP. For a server, unless the DHCP server is configured to always assign the same IP to the same network interface, it’s not optimal. So we’ll change this configuration to define the network statically.
As I mentioned, the thin client will be placed on a shelf without keyboard, monitor, or anything. Now it’s in the way, but that will end soon. And since I want to access it via SSH, I want it to always have a fixed IP assigned and known to me (for that and because we’ll need it when generating certificates to support TLS). To do this, open the file /etc/network/interfaces:
sudo vi /etc/network/interfaces
And modify the configuration of the eth0 interface as follows:
# Configuration for enp8s0
auto enp8s0
iface enp8s0 inet static
address 192.168.1.20
gateway 192.168.1.1
dns-nameservers 8.8.8.8 8.8.4.4
The enp8s0 interface is what Ubuntu automatically creates for me and corresponds to the Gigabit Ethernet interface. The IP 192.168.1.20 is what I want the MQTT broker to always have, and 192.168.1.1 is the network gateway address. To get your local network’s gateway address, use:
route -n | grep "^0.0.0.0" | cut -c 17- | cut -c -16
The dns-nameservers field uses Google’s public DNS servers to resolve names; no need to change them. We’ll leave them as is.
From this point on, I’ll always access the Futro S450 remotely via SSH with the following command:
ssh manolodd@192.168.1.20
Where manolodd is the non-root user I created during the Ubuntu Server installation on the thin client, and the IP address is that of the Futro, as we just saw. So unless otherwise specified, commands from here on will be executed on the Fujitsu Futro, accessed via SSH.
An MQTT Broker for the Fujitsu Futro S450
Which MQTT broker should I install?
There are many open-source MQTT brokers anyone can download and configure. Some are heavy and massive, others lightweight and efficient. Some allow almost endless vertical and horizontal scalability, others don’t scale beyond a single CPU core. So, as in most cases, the decision depends on the requirements. In my case, as I mentioned in the first article of this series: it will handle very little load, must be sufficient, provide service over TLS, support user authentication and ACLs, and run well on a thin client like the Fujitsu Futro S450.
For this context, I prefer Mosquitto. Mosquitto MQTT is a broker that supports the latest MQTT specification by OASIS, supports TLS, has a plugin system with interesting plugins already available, supports MQTT over WebSockets, ACLs, authentication… in short, it supports much more than I require for this particular broker.
![]()
Moreover, it’s written in C, is in Ubuntu’s repositories, and integrates with any Linux system like a glove, just like any other system service. It has exceptional performance in production and requires very few resources. On the downside, it has practically no horizontal scalability—it will only use one CPU core even if others are idle; it has no clustering options… it is what it is! And it’s very good. And I won’t need horizontal scalability for this case. So without a doubt… Mosquitto.
Installing Mosquitto
As I mentioned, Mosquitto is included by default in Ubuntu Server 16.04.1’s official repositories. However, the official repository contains a rather outdated version of Mosquitto, so the first step is to add the Mosquitto repository for Ubuntu:
sudo apt-add-repository ppa:mosquitto-dev/mosquitto-ppa
sudo apt-get update
Now install the Mosquitto MQTT broker with:
sudo apt-get install mosquitto
This not only installs Mosquitto, but also starts it and leaves it running with the default configuration (which in most cases could be more than sufficient).
Testing Mosquitto
The default port used for MQTT is 1883. Since we haven’t configured anything, Mosquitto will be listening on that port. If we use the command:
netstat -ln --tcp
The output will be something like:
Active Internet connections (only servers)
Proto Recv-Q Send-Q Local Address Foreign Address State
tcp   0      0      0.0.0.0:22     0.0.0.0:*       LISTEN
tcp   0      0      0.0.0.0:1883   0.0.0.0:*       LISTEN
tcp6  0      0      :::22          :::*            LISTEN
tcp6  0      0      :::1883        :::*            LISTEN
Where you can clearly see a service on port 1883 over both TCP/IPv4 and TCP/IPv6. This listening service is Mosquitto serving MQTT without TLS.
Now that we know Mosquitto is ready, we’ll do a remote test from another Linux machine. I’ll do it from my Ubuntu workstation on the same local network. First, I’ll install the Mosquitto client on this machine. These tools are very useful for testing and verifying that the broker is working correctly.
sudo apt-add-repository ppa:mosquitto-dev/mosquitto-ppa
sudo apt-get update
sudo apt-get install mosquitto-clients
From there, we’ll have two tools to test as clients: mosquitto_sub to subscribe to a specific Mosquitto topic and receive published messages, and mosquitto_pub to connect to Mosquitto and publish a message to a specific topic. We’ll use both tools. We’ll make a remote connection to the broker with mosquitto_sub on the topic “UnTopicCualquiera” and then, from another terminal or machine, we’ll connect to the broker to publish the message “Hola” to the topic “UnTopicCualquiera,” which will be received by the client subscribed to that topic.
Subscribe to the topic remotely:
mosquitto_sub -h 192.168.1.20 -t "UnTopicCualquiera" -v
Nothing happens. The process doesn’t return to the shell but waits to see if something is published to that topic. Now publish remotely (from another terminal or machine) to the same Mosquitto topic:
mosquitto_pub -h 192.168.1.20 -t "UnTopicCualquiera" -m Hola
The command executes and finishes, returning to the shell. Basically, it connected to the MQTT broker, published the message to the topic “UnTopicCualquiera,” and disconnected. If we go to the other machine or terminal where the client was subscribed to the topic “UnTopicCualquiera,” we see it received a message that “someone” (the publication just made with mosquitto_pub) published to that topic.
mosquitto_sub -h 192.168.1.20 -t "UnTopicCualquiera" -v
UnTopicCualquiera Hola
And it remains there, subscribed, waiting for more messages until we press <Ctrl+C> to end the process.
Conclusion
Having an MQTT broker acting as an ESB with low-cost hardware and low power consumption is very, very simple. Mosquitto is a very powerful and high-performance MQTT broker. With the combination of a 64-bit Thin Client and Mosquitto, we can have an MQTT broker for a long time and certainly a solid base to build very interesting IoT (or not) applications, because it’s very easy to connect your application (mobile app, backend, web…) from any programming language to your MQTT broker.
As soon as I get a chance, I’ll write a third article and quickly explain how to configure MQTT over TLS to access the remote broker securely and, if I have time, also explain what ACL and authentication in Mosquitto are and how to configure them.