Hello, sorry for the delay. I finally found a moment to continue this series. In the first article I explained that I wanted to use a Fujitsu Futro S450 thin client as a permanent MQTT broker for my local environment. I also explained the hardware upgrades I made so it could run an MQTT broker more or less comfortably and at low cost. In the previous article I detailed the steps to change the operating system of the thin client and proceeded to install the first version of the MQTT broker, which I left running with its default configuration. In this article, I’ll explain the steps to configure Mosquitto to serve MQTT over Secure Socket Layer/Transport Layer Security (SSL/TLS) so that all client connections to the broker are secure and encrypted. I’ll configure it and leave it running this way, which is how I need it at home.
Actually, 90% of this article is not about configuring Mosquitto to use SSL/TLS but about everything that needs to be done beforehand with certificates, certification authorities, etc. Let’s begin.
Public Key Infrastructure “for dummies”
Let’s look at an example. For years there has been a scam where supposed workers from a gas distribution company come to your home to perform “installation inspections” and charge a fortune for it. These people show up wearing the uniforms used by the gas company workers and even display ID cards to be convincing. Everything seems to indicate they are real employees. How can we be sure? The most reasonable thing is to call the gas company and ask if those people are who they say they are and if they are really coming to perform maintenance work. After all, we trust that the gas company is who they say they are (they send us the bill every month, we have a signed contract with them that includes the phone number…).
If the company says they are their workers and are coming for legitimate purposes, we can trust them!
Forgive me, purists! Roughly speaking, in this example we’ve seen the very, very basics of understanding a public key infrastructure in the world of computing and telecommunications. There are two actors who don’t know each other and a third party that can be trusted and acts as a notary. When an MQTT client (the homeowner) accesses the Mosquitto broker (the supposed gas company worker), the client needs to contact a Certification Authority, CA (the gas company) to verify that the Mosquitto broker is legitimate and not an impostor.
Everything is much more automated than in the example. Mosquitto will have a digital certificate signed by the CA, and the client can automatically verify that the certificate is indeed signed by the CA. If we trust the CA and the CA has validated Mosquitto’s certificate, our MQTT client can trust that it is connecting to the expected Mosquitto.
Besides authenticating Mosquitto, the truly important thing TLS offers is the establishment of an encrypted communication between the MQTT client and Mosquitto once it’s clear that the broker is who it claims to be. From there, communication is secure between both.
The simplified steps to reach this point are:
- The MQTT client requests a secure connection from the Mosquitto broker.
- The Mosquitto broker sends its X.509 digital certificate to the MQTT client. In short, the certificate includes Mosquitto’s public key, signed by a trusted CA, and is associated with the server’s domain name and IP address.
- The MQTT client checks that the broker’s certificate is indeed signed by a CA it trusts.
- If everything is OK, the MQTT client generates a symmetric key (different for each session) and sends it to the broker encrypted with the broker’s public key (extracted from the X.509 certificate). This way, the key travels securely to the broker since only it can decrypt the message.
- Once the broker receives and decrypts the symmetric key, both the broker and the client know the same key. They can then exchange information securely, encrypted with that key.
For my internal use, which is the goal of this Mosquitto setup, I don’t need an “official” CA to trust. Instead, I’ll create my own CA to act as a notary for all services that require it in my internal network.
Generating the necessary certificates
Creating your own Certification Authority
We’ll use OpenSSL for almost all steps in this post, which must be installed wherever we execute it. I’ll create the CA, certificates, and everything else on the Ubuntu Server of the Futro thin client, so I’ll install it there:
sudo apt-get update
sudo apt-get install openssl
Now we create a directory to store what’s needed to create the certification authority:
mkdir CA
cd CA
And use OpenSSL to create the certification authority:
openssl req -newkey rsa:1024 -x509 -nodes -days 3650 -extensions v3_ca -keyout MiCA.key -out MiCA.crt -subj "/CN=Mi Casa /O=www.manolodominguez.com /emailAddress=ingeniero@manolodominguez.com"
This will make OpenSSL use the system’s entropy to generate a key and an X.509 certificate for the CA. I chose 1024 bits and a 10-year validity. That’s enough for TLS support in my project. The output will look like:
Generating a 1024 bit RSA private key
....++++++
...................++++++
writing new private key to 'MiCA.key'
To verify, OpenSSL lets us inspect the certificate:
openssl x509 -in MiCA.crt -nameopt multiline -subject -noout
Expected output:
subject=
commonName = Mi Casa
organizationName = www.manolodominguez.com
emailAddress = ingeniero@manolodominguez.com
And with that, we’ve created our own certification authority, which I’ve named MiCA.
Generating the server certificate for the Mosquitto broker
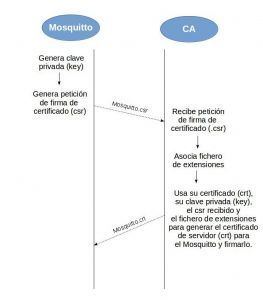
Next, we create a server certificate for the Mosquitto broker installed on the thin client, signed by our CA.
Generate the key for Mosquitto:
openssl genrsa -out MiMosquitto.key 1024
Then generate the certificate signing request:
openssl req -new -out MiMosquitto.csr -key MiMosquitto.key -subj "/CN=Mosquitto en el Fujitsu Futro /O=www.manolodominguez.com /emailAddress=ingeniero@manolodominguez.com"
Generating and signing the server certificate
Now, acting as the CA, we create a file with certificate extensions:
[ MisExtensiones ]
basicConstraints = critical,CA:false
keyUsage = nonRepudiation, digitalSignature, keyEncipherment
subjectKeyIdentifier = hash
authorityKeyIdentifier = keyid,issuer:always
subjectAltName = IP:192.168.1.20
subjectAltName = IP:127.0.0.1
subjectAltName = DNS:localhost
subjectAltName = DNS:futro-s450
certificatePolicies = @polsection

[polsection]
policyIdentifier = 1.3.5.8
CPS.1 = "http://localhost"
userNotice.1 = @notice

[notice]
explicitText = "These extensions are for server certificates in my local network"
organization = "www.ManoloDominguez.com"
noticeNumbers = 1
Then sign the certificate:
openssl x509 -req -in MiMosquitto.csr -CA MiCA.crt -CAkey MiCA.key -CAcreateserial -CAserial MiCA.srl -out MiMosquitto.crt -days 3650 -extfile extensiones.txt -extensions MisExtensiones
Preparing Mosquitto to work with TLS
Placing certificates and keys in the correct locations
Move the files:
sudo cp MiCA.* /etc/mosquitto/certs/
sudo cp MiMosquitto.* /etc/mosquitto/certs/
Protect the private keys.
Configuring Mosquitto
Edit the config file:
sudo vi /etc/mosquitto/conf.d/tls.conf
Add:
listener 8883
tls_version tlsv1
cafile /etc/mosquitto/certs/MiCA.crt
certfile /etc/mosquitto/certs/MiMosquitto.crt
keyfile /etc/mosquitto/certs/MiMosquitto.key
require_certificate false
Restart Mosquitto:
sudo /etc/init.d/mosquitto restart
Testing secure connections to Mosquitto
Check listening ports:
netstat -ln --tcp
Expected output includes:
tcp 0 0 0.0.0.0:8883 0.0.0.0:* LISTEN
Test subscription:
mosquitto_sub --cafile MiCA.crt --tls-version tlsv1 --insecure -h 192.168.1.20 -p 8883 -t "UnTopicCualquiera" -v
Test publication:
mosquitto_pub --cafile MiCA.crt --tls-version tlsv1 --insecure -h 192.168.1.20 -p 8883 -t "UnTopicCualquiera" -m Hola
Expected output:
UnTopicCualquiera Hola
Conclusions and Next Steps
Understanding OpenSSL deeply is not trivial. Sorry if this article is dense, but I felt it was essential to grasp the basics. Creating a CA and server certificate is doable with some research. Configuring Mosquitto for TLS is very simple once you have the certificates.
In the next and final article of this series, I’ll cover user authentication and ACLs supported by Mosquitto.